Are you looking to learn how to create a boutonniere for a ceremony? Are you in search of technical tips to make this accessory yourself?
You are in the right place.
As a florist specializing in events, I frequently create floral arrangements for ceremonies. This includes flower combs and crowns for the ladies, as well as the well-known boutonnieres for the gentlemen.
Today, I will share my professional expertise with you and guide you through creating this type of accessory on your own.
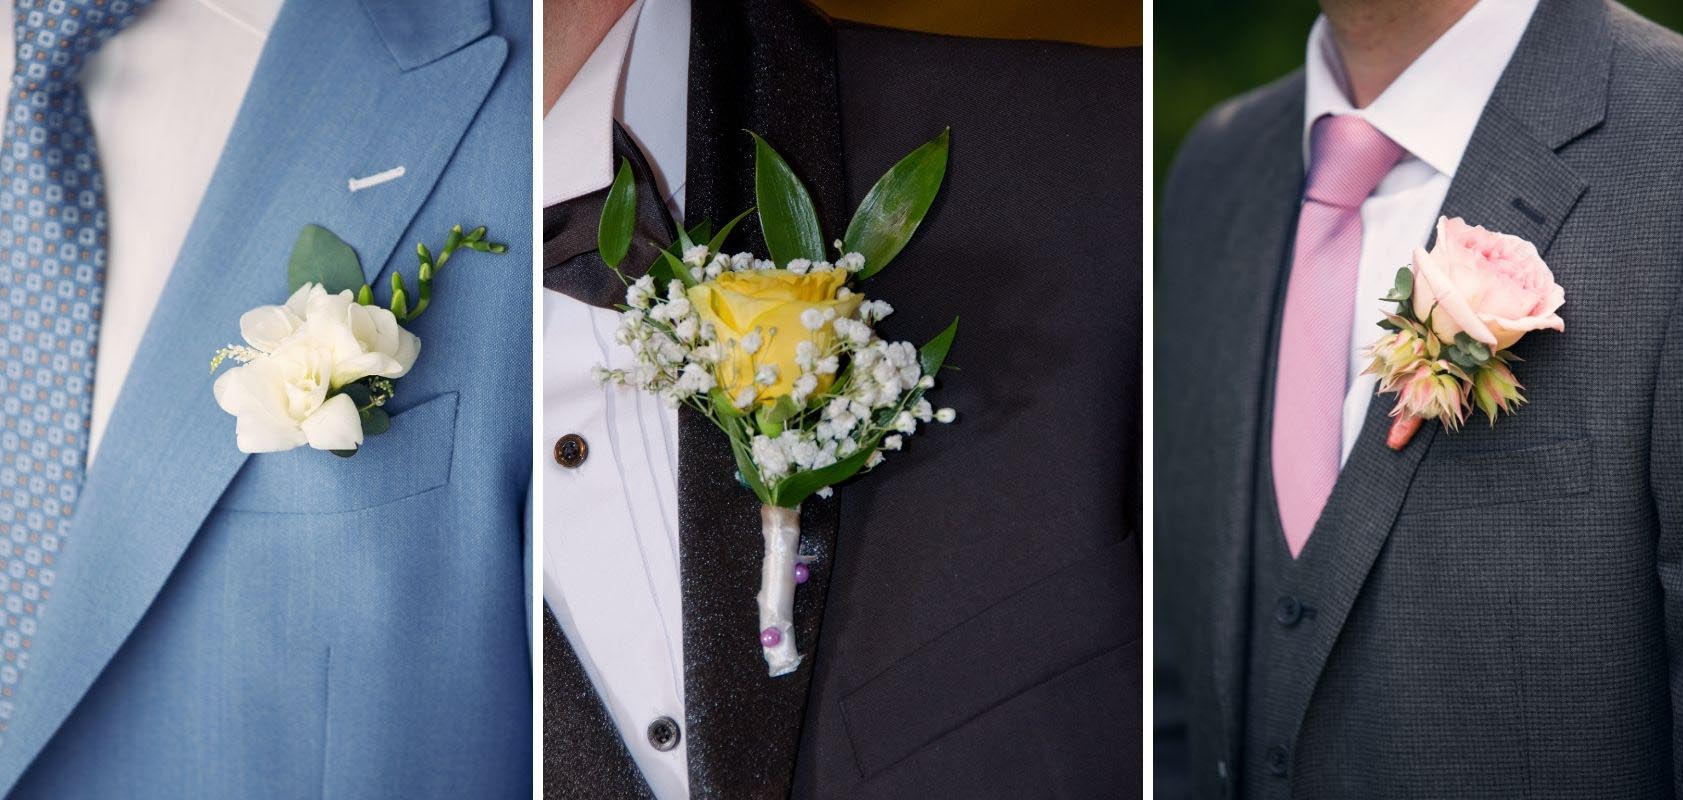
A boutonnière is a floral accessory worn by men during special events, particularly weddings. It is placed on the lapel of a suit jacket, using either a pin or a magnet. To make one, simply create a small bouquet that is about 3 to 4 inches tall using suitable flowers and greens. Then, tie the stems together with a special adhesive tape called Floratape, and attach the pin back using the same tape. Finally, to hide the adhesive, you can wrap it with decorative ribbon or jute string. The boutonnière should be made just before it’s worn. It allows the wearer to coordinate their outfit with their partner’s attire, especially if she is wearing a floral accessory like a flower crown, for example.
Are you ready to take action? Then read this article to learn:
- What a boutonniere is
- When and how to wear this type of accessory
- How to make a boutonniere yourself for a groom, a best man, or even a child
- Some professional techniques to easily achieve your creation
What is a Buttonhole?
Emerging in the 19th century, the boutonniere is a floral accessory designed to be attached to the lapel of a suit jacket. It resembles a small, delicate bouquet and is secured using a magnet or a pin clip.

When do you wear this jewelry?
Originally, this accessory was a daily staple for stylish men, but today it is mostly worn during ceremonies.
While it is certainly acceptable to wear a boutonnière for a baptism, it is primarily a floral arrangement that is created for a wedding.
Who Wears This Kind of Floral Jewelry?
The boutonniere is primarily worn by the groom. While it’s not mandatory to wear a boutonniere on his suit on the wedding day, donning this accessory has become a common practice.
Additionally, it’s not just for the groom. Other people may also be expected to wear a boutonnière:
- The witnesses,
- The children of the couple or close family members,
- The fathers of the future spouses.
🛑 However, I do not recommend wearing a boutonniere without the couple’s approval, especially if you are not very close to them. Just like wearing a white dress, which is traditionally reserved for the bride, it could be badly perceived.

How to Create a Buttonhole?
After explaining what this floral accessory is, I invite you to take action and easily create a boutonniere yourself.
Groom’s and Guests’ Boutonnieres: Should There Be a Difference?
When it comes to the groom’s boutonniere, it’s a subtle floral reminder of the bride’s bouquet. It should be made with the same flowers and in the same colors.
For the guests, it can definitely match the bride’s, but it’s not required. For example, you could draw inspiration from the flowers used in the ceremony’s floral decor. The boutonniere worn by the guests should also be smaller and more understated than the groom’s.
❕ The buttonholes for children should be proportional to their size: for a child under 10 years old, I recommend not exceeding 8 centimeters in height.
To prevent any pricking when handling the boutonniere, you can add a small drop of glue to the tip of the pin.

Step-by-Step Guide
In this section, I will walk you through the steps to create your boutonniere: first, we’ll cover the materials you’ll need, then the selection of flowers, and finally, the steps for making it.
👉 If you’re feeling uncertain, I recommend doing a trial run before the big day. Some techniques, such as applying tape and arranging the plants, may require a bit of practice before you master them.
Required Equipment
To create a buttonhole, you will need:
➡️ The Floratape
This stretch tape is specifically designed for plants. It allows you to securely bind the stems of flowers together, ensuring your arrangement stays in place. You can find it online and at garden centers.
 Floratape
➡️ Gala Clip or Pin Clip
These plastic supports allow you to attach pins or boutonnières. They can be found online and at stores that specialize in floral arrangements. You can also ask your florist if they can get some for you.
 Gala Pin
➡️ A pruner, scissors, and an all-purpose cutter
The first two tools allow you to prune plant stems, regardless of their thickness. The all-purpose cutter is used to cut not only plant stems but also aluminum wire, clip ties, and materials like cardboard.
➡️ Floral Glue
This is a cold-use adhesive designed for bonding plants. It will allow you to create a boutonnière by assembling it with a magnet. It’s also helpful for hiding small imperfections by attaching a leaf or floral button directly over them.
➡️ Using Ribbon or Natural Twine
They are used to finish the buttonholes.
The Choice of Flowers
To create a boutonniere, it’s important to select flowers and foliage that hold up well outside of water. Here’s a list of blooms and greenery you can use for your design:
🌼 Flowers (sorted by size, from smallest to largest)
- Gypsophila
- Waxflower
- Freesia
- Statice
- Lisianthus Buds
- Small Hydrangea Blooms
- Branching Roses (variety: Mini Eden)
- Ranunculus
- Classic, Slightly Open Roses
- Calla Lily
🌿 Foliage
- Eucalyptus
- Fern
- Mimosa (in autumn or winter, before flowering)
- Greenthread
- Waxflower foliage
- Thlaspi
✨ More Creative Ideas
- Pink Peppercorn Sprigs
- Small Succulents
- Grasses: Wheat, Pennisetum
- Dried Flowers
❕ It is important to buy or gather your plants just before making your boutonniere. Whenever possible, the boutonniere should be made right before it is worn. If that isn’t feasible, you can prepare it the day before and store it in a sealed plastic box on the top shelf of the refrigerator until it’s time to wear it.
Creating a Classic Buttonhole for a Rustic or Romantic Wedding
To create our design, we will take inspiration from this video that showcases three styles of boutonnières:
- Country style
- Modern romantic style
- Simple, with a magnet
In the following lines, I will provide you with detailed instructions on how to create a rustic, romantic, and/or modern boutonniere.
🔶 Preparations
Gather your materials and clean your workspace.
Prepare the plants by removing the leaves from the stems. Cut the stems, leaving about 2 inches of length.
🔶 Floral Arrangement
Create a small bouquet by placing some foliage in the back. I recommend putting the largest flower in the center, in front of the foliage, and then arranging the smaller flowers around it. The stems should be parallel.
🔶 Securing the Rods
Start by winding the Floratape around the base of the bouquet, then continue down to about 1 cm above where you cut the stems. You can then cut the tape.
Make sure to wrap everything tightly with tape, stretching it well and avoiding multiple layers. The result should be thin and delicate.
🔶 Clip Attachment
Place your clip at the back of your bouquet, against the foliage. Then, secure it just like before by wrapping a strip of Floratape around the stems and the vertical bar of the clip.
You can use two layers of adhesive tape to ensure it holds well.
🔶 Finishes
It’s time to complete your creation. To do this, hide the Floratape by wrapping the stems with ribbon or jute twine. You can secure everything with a knot or a discreet dab of glue at the top of the stems.
If there are any flaws visible on your boutonnière, this is also the perfect time to attach some foliage or flowers to cover them up. Apply glue to the element you want to attach, wait about a minute, then press it gently in place where you want it.
The glue will dry in about half an hour.

Other Techniques to Explore
Regarding the boutonniere with a magnet shown in the video, it can only be made with calla lilies or dried flowers. Simply glue the plant to the magnet, making sure to allow the glue to dry for about half an hour before attaching the boutonniere to the suit.
If you’d like, you can also attach the plants to a piece of cardboard, cork, or other materials, which you can then attach to the magnet yourself.
Feel free to experiment and let your imagination run wild!
How to Create a Buttonhole?
The boutonniere is an accessory worn on the left lapel of a suit jacket. Depending on the method used, it can be attached in one of the following ways:
- like a pin, with a clip system
- using a magnet
Finally, if the person receiving the boutonniere has a partner, whether it’s the bride, a bridesmaid, or a guest, you can match the boutonniere to a floral crown being worn by her.
To do this, simply choose a flower crown that features the same colors and/or the same flowers as those used in the boutonnière.
Interested in this option? Feel free to visit our online flower crown shop to find the perfect style! Our artificial flower hairstyles are made with high-quality materials and are designed to last.
Now that you know how to make one, you can finally get started and create a stunning ceremonial boutonniere!


